Combining custom actions with segues in table cell selections.

Triggering custom actions like open an URL with segues in storyboards is not quite obvious in the first attempt.
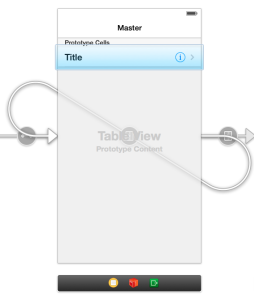
The trick is to drag a segue from the cell to the view controller icon on the bottom of the scene. This segue is pointing to the same scene as seen in the image below:

Screen Shot 2014-05-19 at 12.40.04

Now just set an identifier for the segue and trigger the correct action according to the identifier in the method -prepareForSegue

- (void)prepareForSegue:(UIStoryboardSegue *)segue sender:(id)sender
{
    if ([[segue identifier] isEqualToString:@"showDetail"]) {
        // some other code
    } else if ([[segue identifier] isEqualToString:@"openLink"]) {
        [[UIApplication sharedApplication] openURL:[NSURL URLWithString:@"http://www.apple.com"]];
    }
}

Parse JSON date from .net WebService in Objective-C

In my iOS class @FHNW I set the students a task for creating a CRUD application. The backend is an existing .net REST WebService with JSON. Unfourtanatly Microsoft has decided to create their own date formate instead of using a standard like RFC1123. Therefore the solution to display the date correctly or parsing an NSDate is not strait forward.

You can parse the date the the following snipped:

+ (NSDate *)mfDateFromDotNetJSONString:(NSString *)string {
    static NSRegularExpression *dateRegEx = nil;
    static dispatch_once_t onceToken;
    dispatch_once(&onceToken, ^{
        dateRegEx = [[NSRegularExpression alloc] initWithPattern:@"^\\/date\\((-?\\d++)(?:([+-])(\\d{2})(\\d{2}))?\\)\\/$" options:NSRegularExpressionCaseInsensitive error:nil];
    });
    NSTextCheckingResult *regexResult = [dateRegEx firstMatchInString:string options:0 range:NSMakeRange(0, [string length])];

    if (regexResult) {
        // milliseconds
        NSTimeInterval seconds = [[string substringWithRange:[regexResult rangeAtIndex:1]] doubleValue] / 1000.0;
        // timezone offset
        if ([regexResult rangeAtIndex:2].location != NSNotFound) {
            NSString *sign = [string substringWithRange:[regexResult rangeAtIndex:2]];
            // hours
            seconds += [[NSString stringWithFormat:@"%@%@", sign, [string substringWithRange:[regexResult rangeAtIndex:3]]] doubleValue] * 60.0 * 60.0;
            // minutes
            seconds += [[NSString stringWithFormat:@"%@%@", sign, [string substringWithRange:[regexResult rangeAtIndex:4]]] doubleValue] * 60.0;
        }

        return [NSDate dateWithTimeIntervalSince1970:seconds];
    }
    return nil;
}

This solution is copied from stack overflow.

To produce a .net WebService compatible date string again the solution is a little bit simpler. The important parts are caring about second/millisecond base and the time zones:

+ (NSString*)dotNetJSONStringFromDate:(NSDate*)date
{
    NSDateFormatter* formatter = [[NSDateFormatter alloc] init];
    [formatter setDateFormat:@"ZZZ"];
    
    NSString* timezone = [formatter stringFromDate:date];
    
    int timezoneOffset = [timezone intValue] * 36;
    NSTimeInterval timeInterval = [date timeIntervalSince1970];
    
    unsigned long long time=((timeInterval - timezoneOffset) * 1000);
    NSString* dateTimeTosend= [NSString stringWithFormat:@"/Date(%lld%@)/", time, timezone];
    
    return dateTimeTosend;
}

iOS Logic Tests with CocoaPods and RestKit

I wanted to create for my RestKit mappings simple tests to get all the complicated relation mappings correct. First I tried it with usual tests but soon gave up because they start the whole application which made the tests quite slow and network dependent.

So I remembered the possibility of creating logic tests which require only a small testbed. After some time of unsuccessful attempts I remembered, that using CocoaPods might have an impact on the newly created Target for the logic tests. So I had to set the CocoaPods configuration for the new target in the project configuration.

But still it was not working because the linker had problems in finding my own classes. I checked everything: Imports, target dependencies, associated targets of the class files, header search paths, etc. But nothing seemed to help.

Until I found a little bit strange solution on the net which did the trick:
Setting the “Bundle Loader” and “Test Host” fields in the build settings:

Bundle Loader = $(BUILT_PRODUCTS_DIR)/<identifier>.app/<identifier>
Test Host     = $(BUNDLE_LOADER)

After this it worked fine. But as far as I understood it the idea of logic tests is not to start the full simulator and application. Maybe someday I will find out.

SWT Sashes with minimal size

A cool feature of SWT are sashes. They are ideal for creating flexible editors and views. But they have one major drawback (as do all SWT components). There is no way to set a minimal size on controls which the sash would use to calculate its range to move around.

This is one of the features I miss most from Swing.

There is of course the self made way and thats what I show in the following code examples.
First we need to create the content with the layout:

// Our member variables:
Composite firstPart;
Sash sash;
Composite secondPart;

private void createContent(Composite parent, FormToolkit toolkit) {
  parent.setLayout(new FormLayout());
  firstPart = toolkit.createComposite(parent);
  createFirstPart(firstPart); // This method creates buttons, labels what ever inside this composite

  sash = new Sash(parent, SWT.HORIZONTAL);
  secondPart = toolkit.createComposite(parent); createSecondPart(secondPart); // Same as above
  FormData firstFormData = new FormData();
  firstFormData.left = new FormAttachment(0, 0);
  firstFormData.right = new FormAttachment(100, 0);
  firstFormData.top = new FormAttachment(0, 0);
  firstFormData.bottom = new FormAttachment(sash, 0);
  firstPart.setLayoutData(firstFormData);

  FormData sashFormData = new FormData();
  sashFormData.left = new FormAttachment(0, 0);
  sashFormData.right = new FormAttachment(100, 0);
  sashFormData.top = new FormAttachment(50, 0); // This will place the sash in the middle
  sash.setLayoutData(sashFormData);

  FormData secondFormData = new FormData();
  secondFormData.left = new FormAttachment(0, 0);
  secondFormData.right = new FormAttachment(100, 0);
  secondFormData.top = new FormAttachment(sash, 0);
  secondFormData.bottom = new FormAttachment(100, 0);
  secondPart.setLayoutData(secondFormData);
}

With this we will get two parts separated by a horizontal sash. The two composite create methods just create their content and set the composites layout. Preferably a grid layout with grabs space.

But it’s still possible to drag the sash over the content of either part. Assume we have a table with some buttons beside it in the first part: this will be a serious problem. The table will adjust its size if we make the first part bigger, but if we make it smaller there is a point where the content will vanish under the sash (or more exactly under the second part) and the scrollbar of the table might not even appear because the composite and therefore the table does not get smaller.
So we do actually have a minimal size of the composite but which no one respects. Neither the sash or any other control.

So we have to adapt to changes of the sash position as well as changes to the size of the surrounding composite. Therefore we have to listen to either changes of the sash position or changes to the control and do something to the layout:

sash.addListener(SWT.Selection, new Listener() {
public void handleEvent(Event e) {
layoutSash(e);
}
}
parent.addControlListener(new ControlAdapter() {
public void controlResized(ControlEvent e) {
layoutSash(null);
}
}

private void layoutSash(Event e) {
FormData sashFormData = (FormData) sash.getLayoutData();
Rectangle sashRect = sash.getBounds();
Rectangle workAreaRect = sash.getParent().getClientArea();

int totalHeight = workAreaRect.height;
int minimalSecondPartHeight = calculateMinimalHeight(secondPart).;
int absoluteSashMinY = calculateMinimalHeiht(firstPart) + 5;

sashFormData.top.numerator = 0; // As we use offsets from now on we must set the numerator back to zero

if (e != null) { // if we call this from a sash change:
int maxY = totalHeight - minimalSecondPartHeight;
if (e.y <= absoluteSashMinY) {
e.y = absoluteSashMinY;
sashFormData.top.offset = absoluteSashMinY;
} else if (e.y >= maxY) {
e.y = maxY;
sashFormData.top.offset = maxY;
} else {
sashFormData.top.offset = e.y;
}
} else {
if (firstPart.getBounds().height < absoluteSashMinY) {
sashFormData.top.offset = absoluteSashMinY;
}
if (this.entriesWidget.getBounds().height < minimalSecondPartHeight) {
sashFormData.top.offset = totalHeight - minimalSecondPartHeight;
}
}
this.parent.layout(true, true);
}

Now all we have to do is to create a sensible implementation of the calculateMinimalHeight and we have it.
SWT ScrolledComposite not visible (until it’s parent is satisfied)

A ScrolledComposite has some special requirements to its parent, which is quite unusual in OOP with composite patterns. The content should be parent agnostic.

The ScrollComposite absolutely refuses to work properly if the parent composite does not have the FillLayout.

Hopefully it took you not the two hours I have spent until finding this undocumented fact.